Reinstalling the system of an Android smartphone may be necessary in several situations: a device that no longer starts, persistent bugs, or after a software modification that went wrong. The ROM flash involves completely replacing the installed operating system with a stable and functional version. This procedure requires rigor and preparation to avoid any data loss or hardware damage.
When done correctly, it allows you to regain a fast, clean smartphone free of accumulated software issues.
Prepare your device for the flash
Before any manipulation, preparation is essential. Several steps ensure that the process runs without risk.
First of all, backing up all your data is essential. Photos, contacts, messages, applications, and personal files must be transferred to a computer or cloud service. Once the ROM is reinstalled, all data will be erased, and restoration will be necessary.
Next, make sure the smartphone is charged to at least 70%. A power cut during the flash can render the device unusable.
It is also necessary to unlock the bootloader, depending on the phone model. This process differs between manufacturers and can sometimes void the warranty, but it is essential to manually install a custom or official ROM. Some manufacturers offer official tools to simplify this step.
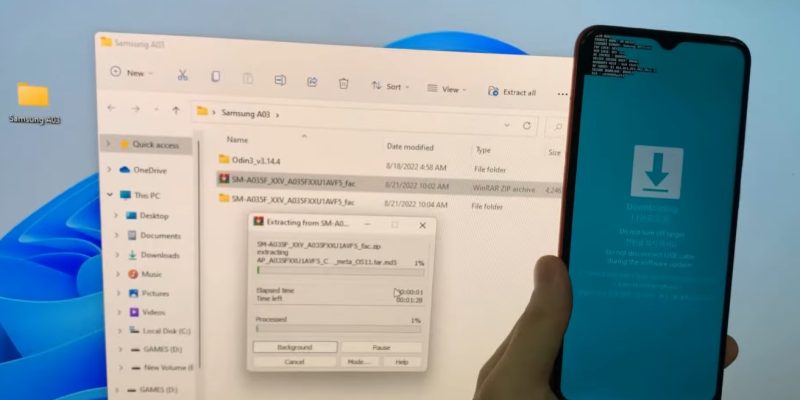
Finally, prepare the necessary files: the official or custom ROM corresponding to the exact model of your smartphone, as well as the USB drivers to allow communication with the computer. Having suitable flash software, such as Odin for Samsung or Fastboot for most other brands, is also crucial.
Install the ROM via Fastboot or manufacturer tool
The next step is to transfer the ROM to the device and start the flash. Depending on the manufacturer, the process varies slightly, but the principles remain similar.
For smartphones using Fastboot: the phone must be started in bootloader mode. Then, via the computer, specific commands are used to flash each component of the system: boot, recovery, system, and vendor. Each file must correspond to its exact location, otherwise, the smartphone may not start correctly.
For Samsung devices, the Odin tool allows you to select the ROM and transfer it directly. Simply start the device in Download mode, connect the USB cable, then load the files into the corresponding slots of the tool. The process is guided, but each step must be followed scrupulously.
Some ROMs offer complete installations via a single file, while others require multiple file-by-file flashes. Patience is required: the process can take several minutes, and any interruption can render the device unusable.
Restart and configure the smartphone
Once the flash is complete, the initial restart may take longer than usual. Android proceeds to optimize the system and rebuild caches. It is important not to interrupt this process, even if the screen remains frozen for a few minutes.
When the smartphone restarts, it will be like new, without installed applications or personal data. You will need to proceed with the initial setup: Google account, language, wifi, essential applications, and possibly restoration from the previously performed backup.
Take the opportunity to check that the installed ROM is stable: test network connectivity, basic features (calls, messages, camera), and overall fluidity. Optimal operation from the start indicates that the flash was successful.
If problems appear, it is possible to reflash the ROM or test an alternative version, remaining vigilant about the exact compatibility with your smartphone model.
Tips to avoid complications
Flashing an Android ROM is not without risk. To limit problems, certain precautions are recommended:
- Verify the exact compatibility of the ROM with the model and variant of the smartphone. An incorrect ROM can brick the device.
- Download files from reliable sources, to avoid corrupted or malicious files.
- Prepare a recovery tool, such as TWRP or a backup ROM, in case the system does not restart.
- Take your time, follow each step carefully, and do not connect other peripherals during the flash.
- Keep a full or plugged-in battery, to avoid any interruption.
These best practices greatly increase the chances of success and minimize the risk of data loss or software damage.